Many of you already know about my new big screen home theater. Though not all of you know exactly what it is. So here's the story. For about three years now I have wanted to make my own outdoor theater. This year I've finally put one together. In addition to several other websites I used the the forums at the Backyard Theater site for research and moral support. The theater has a few key components that were all chosen for various reasons. My setup consists of a digital projector, screen, some speakers and a laptop. Details on each will of course follow.
Layout
At the moment my back yard goes something like this: House -> Deck -> Yard -> Tree -> Yard.
Because of this I decided to go for rear projection. Essentially it would go Projector -> Deck ->Screen -> Yard/People -> Tree. I like that the only thing visible will be the screen. Any wires, electronics, speakers etc will be hidden. The benefits of this setup is that the projector is setup inside the house where it can be protected as well as powered. Also it also has the benefit of allowing the movie source to be inside as well. This will restrict a few things.
- The projector must have a rear projection mode which sends horizontally mirrored image.
- The screen can not be bigger than the projector can reach from the throw distance. Throw is equal to the distance from the projector to the screen.
- The projector position must allow for the image to be shown through the window and still hit the screen. It can't be too wide low or high.
- Sound must be sent out from the house in some way.
My first purchase was a projector.
Projector
I borrowed a projector from my friend Greg so that I could get a feel for 'what projectors are like these days'. His was an Infocus ScreenPlay 4800. Since I didn't have a screen yet I just projected it onto the slanted part of the ceiling upstairs. Connecting it to my laptop I played a DVD and some movie files. For the sound I just plugged in my computer speakers. It worked pretty well. I was excited to know that the projector would be useful indoors as well as out.
And so I searched... Circuit City had a good deal on one that I decided to look into further. The Infocus IN26 was now on my list as a prime candidate. I used the Projection Calculator on Projector Central to check a few things out. The Calculator allows you to enter in the type of projector that you have. It has tools to adjust the screen size, zoom or throw distance. Based on the capabilities of the projector it will let you know if it will work or not. I knew that I wanted at least a 10' wide screen. I also knew that I wanted to keep the projector in the house and have the screen close to the edge of the deck.
The screen size was quite manageable. The throw needed would put it at least 6 feet from the deck. Ugh. I went to the window and measured the width of the opening. By putting that width into the calculator as the screen width. Happily it showed that it took several feet before it would reach that width. In other words, I could back up the projector inside the house without it hitting the window frame. Now I can put the screen closer to the deck with no trouble.
Technical plusses for the IN26 are
- 1700 Lumens, above average brightness
- Front, rear and ceiling (upside down) projection modes
- 1024 x 768 resolution, improved clarity
- Low heat and good bulb life
- Light weight, small size
Thanks to a promotional deal, I don't have to make any payments until 2009. With that identified I bought the Infocus for $600 + $150 for a 4 year service agreement and finalized my plans for the screen.
Screen: Frame
For a screen I wanted
- Mobile
- Rear Projection
- 10' or wider
Because of the screen's location. I need it to be mobile to some extent. I can't have it staying there all summer long. It would be like having a ship parked in my back yard. I looked over a few options and I found that the most likely choice would be something put together with canopy fittings. Canopy fittings are essentially socket joints for pipes. They come in various sizes and orientations. Many of the folks at the Backyard Theater site use something similar. I found a very detailed setup for a 20' x 10' screen. It was adaptable to other sizes. I just needed to figure out how to do it. The other problem is the big screen design wouldn't work for rear projection since it had poles that supported the middle of the back of the screen.
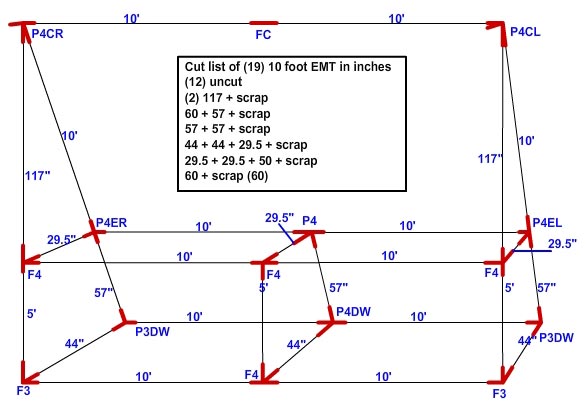
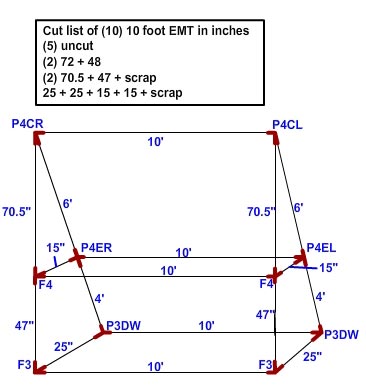
 Using my handy drawing skills I came up with several versions of the screen. A 20' rear projection version of the original, a 10' wide screen and a 10' wide version with reduced cutting (shown below). This last version was ideal because the fittings (P4EL,P4ER,F4) can slide up and down on the poles. Not only does this allow for less pipe cutting, but it also provides this screen with a unique feature adaptable screen sizes. By sliding the middle bars to a point 2'5" from the ground the screen will match a 4:3 full screen. At 4' from the ground the screen will be in 16:9 widescreen. The 15" bars in the middle can still span the gap if it is in full screen, just not as tight. There is another size (cinemascope?) that is often used, 2.35:1. For those of you counting at home that comes out as a 150" fullscreen, 138" widescreen or a 130" cinemascope. The 15"ers however they are too long to allow the screen to slide up to that size. Not a big deal though.
As far as storage we can take the cross bars off and leave the triangles on the side together. Mostly the frame is just kept together and moved to other parts of the yard so that it's out of the way. It's not very heavy either. I can pick it up by myself and walk it around if I stand in the middle between the bars. Just a little awkward.
Screen: Surface
I initially waned to do this as cheaply as possible. For the screen I initially planned on using a tarp. There are several kinds that allow for a good quality rear projected image. None of them are really 'cheap' for something that size. Luckily my old roommate Chris had left a 4mil plastic painter's tarp. It is a hazy, but transparent plastic that is relatively durable. The roll was 10' wide so it was a perfect first try for a screen. WIth the projector ready, I pointed it out the window and Steve and I went out into the yard holding either end of the tarp. It actually looked pretty clear. We made an estimate as to how high the 10' wide image started on the screen. It was something between 4 and 5 feet. Tipping the projector a bit would get it lower without much problem.
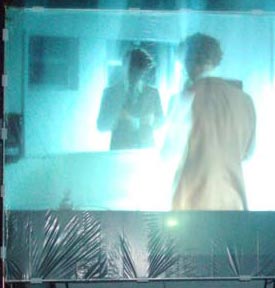 When the canopy fittings arrived I went out to Lowe's and picked up the 1" emt pipe (typically used for electrical conduit). I put it all together one night and popped on the screen the next. To attach the screen I used fabric clips purchased from the same place as the fittings. The screen worked great. After a few showings though I the plastic started getting stretched out and became irregular in spots. In this picture you can see that the screen is smooth in places, but bunched up in others. You can also see the 'hot spot' in the middle just below the image. This is because the projector light is very bright if you are looking right in line with the bulb. Hard to avoid in a rear projection. The trick is to have the projector sitting lower than the image. You can also have the people sit lower to help reduce this. If I had put the screen into widescreen mode it wouldn't have been visible.
Through many online conversations I arrived at the decision that I should upgrade the screen to a fabric made by Dazian called Trapeze. It is a stretchy white fabric that works very well for rear or front projection.
The Trapeze was a huge a improvement. While it was significantly more expensive than free, it wasn't a bad deal at all. I'd estimate the whole screen setup emt, fittings, clips and fabric to run somewhere around $270.
Sound
For a sound system I had an easy idea. Unfortunately it was uninformed and would have resulted in damaging some of my equipment. Luckily I was educated about that before I tried it out. The thing that I forgot is that some speakers are powered. Like most computer speakers they amplify themselves. Others are not powered and require an external amplifier to get the volume up. Since I didn't have an easy way to amplify the speakers, I chose to go for the powered speaker setup for now.
At the moment I have two setups that I use. The first takes advantage of some wireless speakers. I simply plug the broadcaster into the laptop and plop the speakers out beside the screen. The speakers (Acoustic Research 811 and 812) have a setting for left and right. There is even a volume knob right on the speaker. It works just fine for most movies but they are by no means high quality.
My second option is to use speakers that I borrow from work. They are really nice and in the 4 years I have been with the office, they haven't been turned on for any work related. With Jackie's blessing I relocated the speakers to the house for research purposes.
Wiring was a bit of an adventure. Power was easy, but the speakers have 1/4" mono jacks and the computer has a 1/8" stereo port. From work I had two 5' cables that were 1/4" male to rca male. With 15" between the laptop and the speakers I had to come up with something to clear the difference. Radio Shack had a very long 1/8" stereo male to 1/4" stereo female and a 1/4" stereo male to 2 rca mono females.
So now between the two setups it's pretty easy to get the sound going. I can't really do surround sound. But maybe somewhere down the road I can figure out a good way to do that. for now. It's good sound and a great picture.
Setup
Setting up the screen is a team effort. Typically I take care of the indoor things while others knock out the outdoor elements.
To start, the frame is adjusted to match the picture dimensions (full or widescreen) using the markings on the vertical poles as a guide. The frame is then tipped over onto its back and placed onto two outdoor foot stools so that it is off of the ground. The Trapeze is then attached first at the top corners and then along the sides and top. Typically we do this with the help of 3 people. Once the sides and top are done, the screen is stood up carefully so that any extra fabric doesn't get dirty on the ground. The bottom of the screen is then pulled tight against the bottom cross bar and attached with more fabric clips.The screen is then moved so that it stands 3' from the deck and is propped up by a 4x4 on the left side. This makes sure that it is level.
The speakers are carried out to the deck and places so that they just far enough in that are hidden by the screen. The power and audio cables get tossed out the kitchen window where they are attached. Just for the record, red is for right and white is for left. I always forget either that or the fact that the right side of the screen is the left side from behind. It doesn't always matter. Sometimes it's a pain though.
Seating is straightforward. chairs from the deck are brought out and placed under the tree. We often bring along blankets as well. Most nights we have to avoid bugs too so I've found that the OFF Mosquito Repellant Coils work well. Essentially they are a spiral of incense that is unpleasant to bugs.
Inside the house the stand for the projector is assembled. I use an end table from the living room with one of our mail boxes (which looks like an in/out type box) flipped upside down. A 1"x4" is placed under the rear of the projector to make sure that it is angled properly. When the projector is turned on it hits the bottom of the window sill somewhat. This turns out to be ok because in widescreen there is no image there.
For cinema screen I tilt the image so that it is higher on the screen and the top black bar isn't seen. To keep the bottom band as dark as possible I adjust a strip of wood sitting in the window sill to block out any additional light that may be coming from the projector. For fullscreen I add a second mailbox to the stack and angle the projector a bit differently. I rarely use this though so I don't remember the specifics.
Snacks
Candy, popcorn and drinks are always available for movies. In one case we even had 'taste-o-vision'. During a showing of Goonies we provided Baby Ruths, and chocolate truffles. Currently I think that there are Peppermint Patties, Mounds, Reese's cups, Goobers, Taffy, Gum, Warheads, and a lot of other random things that I can't remember off of the top of my head. I looked around for an old fashioned popcorn machine but I didn't find any that were reasonably priced. I could get an airpopper, but for now we stick to the microwave kind if anyone wants it.
Movies
Once the screen went up we've been trying to get one or two movies in each week. Lately we've been having movies on Thursdays and Saturdays (weather pending). Here's the list as best I can remember.
Single showings |
Double Features |
Napolean Dynomite Farce of the Penguins Vacation Blade Runner Music and Lyrics Snatch Goonies 300 Sin City |
Quest for the Holy Grail Life of Brian |
Snakes on a Plane Airplane! |
|
The Messangers Dark Water |
|
Top Secret! Top Gun |
Stand
Since the movie projector stand was just pieced together from various parts furniture and boxes I have drew up a quick plan for a stand. Check out the woodworking page to see what I came up with.